Kategori: English

  • The joys of local nature

    The joys of local nature

    I am lucky enough to live close to nature. A choir of birds wake me up way too early every morning at this time of the year, and if I go out for a walk, I can be surrounded by trees in no time.

    So yesterday evening I grabbed my camera and my long lens and went for a little walk to see if I could get some bird photos. The sun was low and would go down in an hour or so, so I hoped for some good light on the tree tops. I walked quietly through the woods, as not to scare the birds.

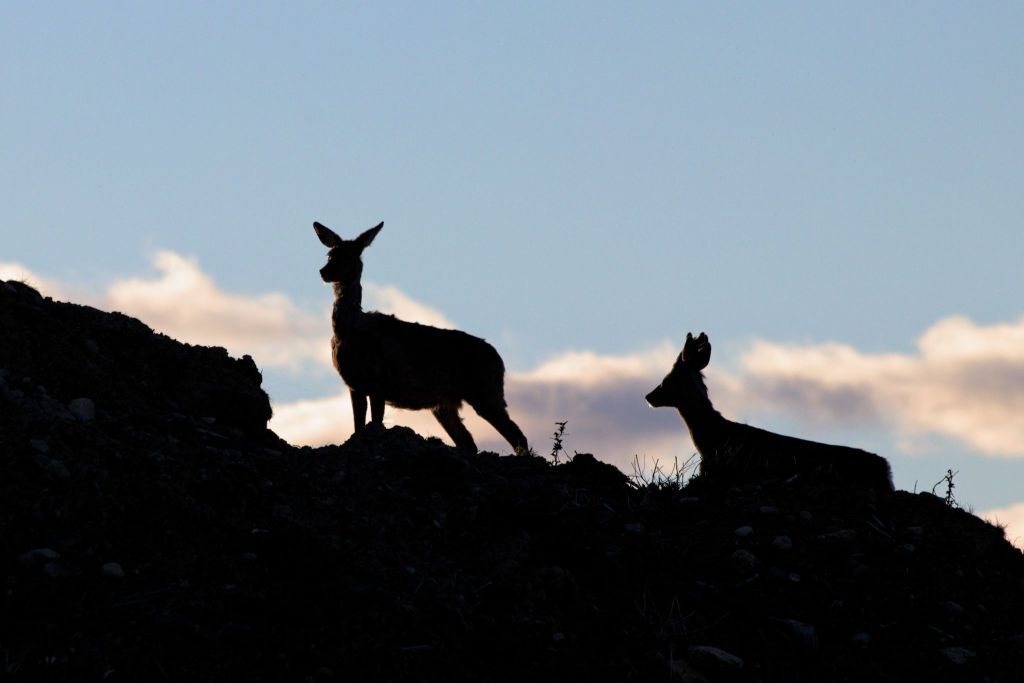
    I didn’t think much of larger wildlife, but after a while I heard a sound some distance to the right and behind me. I turned around and saw two deer climbing a steep slope. I raised my camera to the eye and fired off a few shots, but as it was against the light I didn’t have much hope. Luckily, I had my camera set to Manual mode and I had already set a decent exposure. Therefore I knew it wouldn’t be too far off, even though I had set it for when I would have the light from behind. That’s the beauty of Manual.

    As the deer climbed to the top of the slope, I saw them silhouetted against the sky, and I got this as my final shot of them:

    Fugler Flateby_0041_2048
    Two deer. Canon 80D with Canon EF 70-300 f/3.5-5.6 IS USM @300 mm. 1/1000 s, f/8, ISO 800

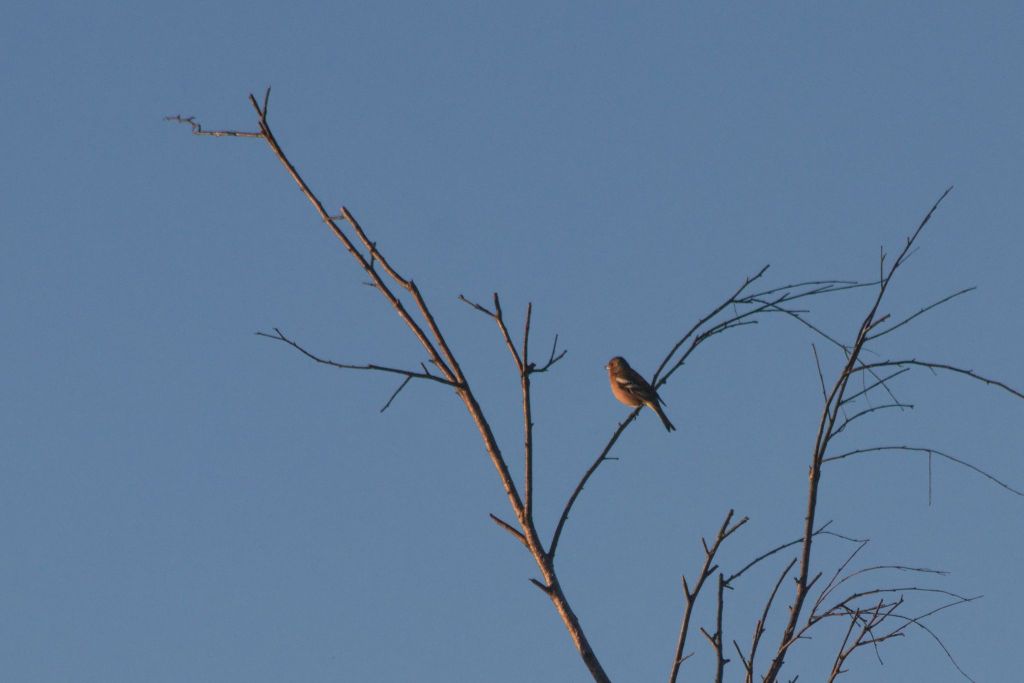
    After the deer disappeared, I sat down on a rock, waiting for some birds to come by. Most of the birds around here except for magpies and crows are quite small, and my lens is only 300 mm in the long end on a crop sensor camera, so I didn’t expect to get any real close ups, as the birds are quite shy. This chaffinch is a good example of what I could expect:

    Fugler Flateby_0048_2048
    Chaffinch. Canon 80D with Canon EF 70-300 f/3.5-5.6 IS USM @300 mm. 1/1000 s, f/8, ISO 800

    This is also a quite heavy crop, and my lens is not the sharpest when fully zoomed in. It is still fun to go hunting, and some times unexpected things happen.

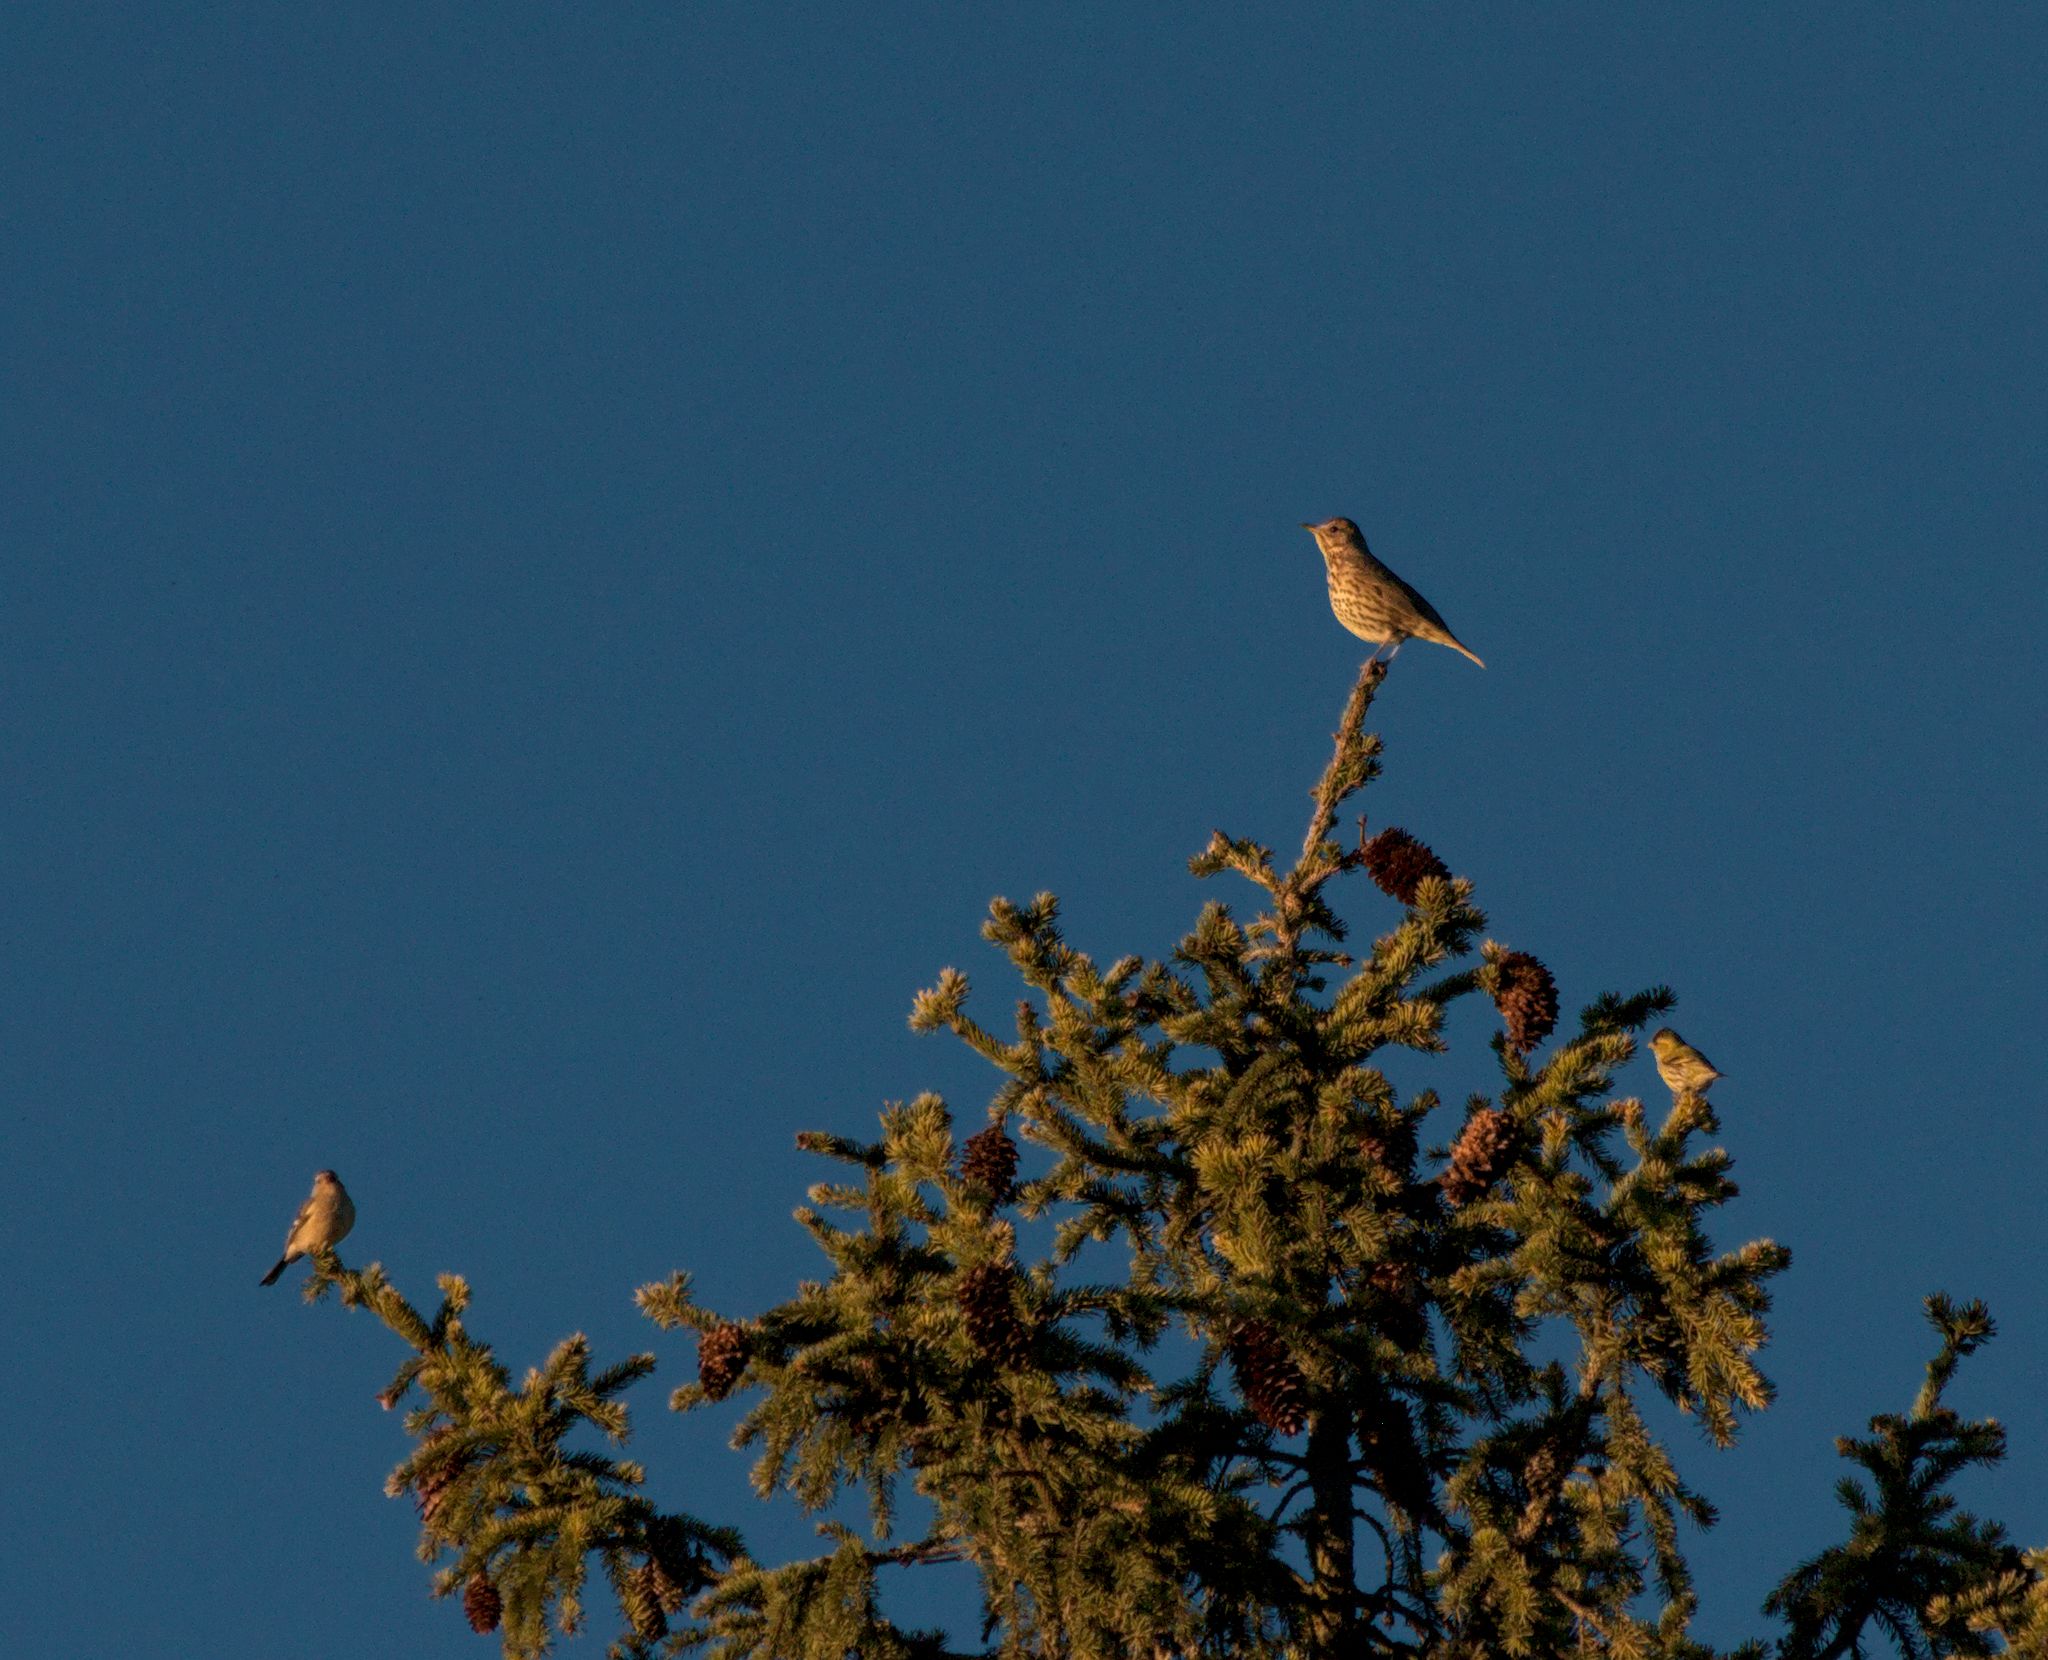
    On my way back home, I spotted this bird that was sitting in the very top of a tall spruce. It was a bit larger, but I didn’t know what it was. I’m no expert on birds. It had a beautiful song and it was catching the light very well, so I took a bunch of images of it. I also saw another little bird up there that was too small to recognize.

    When I got home and looked at my images on the computer an also googled a bit, I found out that the bird in the top of the tree was a song thrush (Turdus philomelos). That was very fun, because it was the first time I had seen and identified one!

    The other bird I had seen up there turned out to be a chaffinch
    (Fringilla coelebs), and then to my surprise I noticed a third bird in the image. I didn’t know this one either, and it turned out to be a eurasian siskin (Carduelis spinus). Another first! I had never identified this one before either.

    So a little walk around the neighborhood with a camera can give a lot of both exercise, exciting experiences and new knowledge. Do you have a fun experience from you local nature? Let me know down below!

    Fugler Flateby_0066_2048
    From left: chaffinch, song thrush and eurasian siskin. Canon 80D with Canon EF 70-300 f/3.5-5.6 IS USM @300 mm. 1/1000 s, f/8, ISO 800
  • Rediscovering old images

    Rediscovering old images

    I’ve been using cameras for more than forty years now, since I was eleven years old. For almost thirty years, I shot only on film. I never had access to a darkroom, so I always had to send the exposed films to a lab of some sort and get back the film and prints. At first 9×9 cm prints from my Kodak Instamatic. Later I switched to 35 mm cameras that gave  10×15 prints.

    I captured many memories, and from time to time I took a picture with a little more thought behind it, not for the memory, but to possibly make a nice picture. More often than not, I got somewhat disappointed when I got the prints back. The composition was more or less as I wanted it, and the exposure was for the most part right, but there was always something missing. The colors might be off because of the printing machine’s automatic balancing of the colors, or the details were missing in the highlights and shadows due to the limited dynamic range of the paper. Also, in cases of low light, the images weren’t only dark, but the blacks used to be lifted up to some kind of mushy grey, ruining everything.

    Thankfully, I saved the negatives right from the start. Or, mostly. After the first few years I became sloppy, an much is missing from the eighties, and a bit from the early nineties. Some times a whole year or two, sometimes only a piece or two of four images out of one film roll. I have no idea how that happened, if I threw them away on purpose or if they have gone missing somehow.

    So, last year I started scanning the negatives. First I had scanned many of the old prints, but I kept thinking of all the images I was not satisfied with, so I tried to scan some negatives with my DSLR. The process is a bit cumbersome and requires a fair bit of practice, but I was amazed at how good the results were when I learned how to process the images. It was like being there and taking them all over again, seeing things I hadn’t seen since the day the images were taken. Details popped out from both shadows and highlights, and images taken at night in low light could have black shadows and popping highlights. In many cases I can still remember what I was thinking when I took the pictures, how I wanted them to be, and the disappointment I felt when I saw the prints. And now, decades later, I am finally able to get what I wanted back then!

    In the autumn I got hold of a flatbed scanner that could scan film, and I switched to using that. The scanning process was slower, but the scans required less processing. I haven’t yet done a proper test to find out which method is the best or fastest. That is really not relevant for this post. the point today is to show how much information is recorded on the film that got lost in the prints, especially in high contrast situations.

    A real eye-opener was this image from 1988, taken with a Pentax Pino 35e point-and-shoot. Fixed focus and only automatic exposure, one of the simplest and cheapest cameras on the market at the time. First a direct scan of the print:

    Print 02

    Then a flat scan of the negative to preserve all detail in shadows and highlights:

    024-scan

    All that beautiful detail was hidden in the negative, and I didn’t see it until 31 years later! Then I added back some contrast and got this:

    024

    Another example is from Brighton, UK, 1992. Shot in low light with a weak built-in flash and the same Pentax camera, it shows what often happened to underexposed images. The prints were lacking color and contrast, and with porridge-like shadows.Print 01

    Scanning the negative and then processing the resulting image gave me something much more realistic:

    1992_104

    So the tip of the day is: If you want to rediscover your past, get your negatives scanned! You’ll most likely discover some treasures.

  • Digitizing film negatives with darktable

    Many of us who have lived for a while have lots of old negatives lying around in drawers and boxes in the back corner of a closet. And many of the younger generation have recently discovered a “new” kind of photography: Film photography, or analog photography as they tend to call it. Digging out their parents’ old cameras and loading them up with a very limited amount of “memory”, and no chance to see the result until the film is developed.

    Once the film is developed, either by yourself or by a professional lab, you might want to get the images onto your computer, to let them into the modern world of image processing, archiving and sharing on social media. The quick and dirty way would be to let the lab do this for you. The fun way is to do it yourself. This is where darktable comes into play.

    I admit that darktable may not be the easiest application for converting negatives. For me, at least, it seems to be the best solution all in all, especially since it is a one-stop shop for the whole process from capture to finished image, and also because it is the RAW developer that I know the best.

    Capture

    Capturing the images can be done in two ways, either with a scanner or with a digital camera. So far I have had the most success with using a camera, and this is also the way that makes darktable a true all-in-one solution.

    I start with tethering my camera to my computer. That way I have the Live View on the computer screen, so it is easy to check focus. This is essential, as we are working with a very narrow depth of field. It also allows me to trigger the camera with a mouse click, so I don’t have to touch the camera and potentially introduce camera shake and misalignment. And last but not least, I get the images directly onto the computer hard drive and imported into darktable, ready to be processed. To learn about tethering, go and watch this video:

    There are many ways to do the actual capture, and I won’t go too deeply into them here. But you need a light source to shine light through the film, you need some way of holding the film in front of the camera, and you need a stable camera. You can see my own DIY solution in the video at the end of this article.

    Benefits

    One of the great benefits of digitizing negatives is that you will get access to all of the information in the film. I remember I was often disappointed with the 10×15 cm prints I got from the lab. They were what they were. I had no control over the image after the shutter was pressed, and the limited dynamic range meant they often lacked detail in the shadows and highlights. When digitizing the negative you are in full control, and you can see just how much more dynamic range the film has. I’ll give you an example. The following image of a Galapagos Tortoise was shot in Honolulu Zoo on Kodak Gold 200 film. First the scanned paper print:

    Honolulu

    You can see all the detail in the shell, but who knows what is lurking in the shadows?

    Then from the digitized negative:

    0010 Galapagosskilpadde i Honolulu Zoo

    Two more tortoises are relaxing in the shadow back there. And with a little more effort if I wanted to, I could have increased the local contrast to get even better definition in the shell of the main subject and in the sunlit grass. The point is, all the information is there, and you can do wat you want to it.

    Well, I won’t keep you here any more, watch the video and then go and digitize your own negatives.

  • A night in the mountains. Part 2/2, Sunrise

    If you haven’t read Part 1, please go ahead and do so here.

    When I packed up and left the location of my sunset shoot, I had this idea that I might get the chance to do some star photography during the darkest hours of the night. But as the night progressed and I was awake quite a lot of times (if I ever really slept in the first place), I saw that it never became dark enough. At the most I could see a handful of stars, so there was no point in getting out and trying.

    Around 4 am, I drove back to where I was the night before, and I set up at the same spot. I wanted to get the first sunlight on Bitihorn, and also a shot of Bygdin and the distant mountains behind it. A sunrise was right around 5 am, I had plenty of time to find my compositions. Unfortunately, there were no clouds, only a quite hazy, cloudless sky. Therefore I needed to include more ground than sky. I settled on two compositions of Bitihorn, one quite wide and one more tight.

    I could not see the sun directly from my position, so as the sun rose, I had to take several shots just in case the light would be blocked by a cloud just at the right moment. But I was lucky, the sky was just as cloudless in the North-East as it was in the South and West. In the end, these were the two keepers, one of each composition:

    Bygdin-Bitihorn_0058_2048
    Bitihorn sunrise, tight version. Canon 550D, Canon EF-S 15-85 mm f/3.5-5.6 IS USM @67 mm, f/8, 1/5 s, ISO 100

    Bygdin-Bitihorn_0057_2048
    Bitihorn sunrise, wide version. Canon 550D, Canon EF-S 15-85 mm f/3.5-5.6 IS USM @28 mm, f/8, 1/5 s, ISO 100

    Which one do you like the most? Let me know in the comments. I’d also like to know which one is your favourite from my sunset shoot the evening before.

    I also had a nice view of Bygdin to the West from this same spot. I just had to turn 90º to my right and adjust the focal length to get this:

    Bygdin-Bitihorn_0063_2048_01
    Sunrise over Bygdin. Canon 550D, Canon EF-S 15-85 mm f/3.5-5.6 IS USM @76 mm, f/8, 1/4 s, ISO 100

    With a nice sunrise in the can, it was time to break up and head home. On my way back to the car I came by a small field of cotton-grass (Eriophorum), backlit by the morning light. I just had to get that too.

    Bygdin-Bitihorn_0070-Bygdin-Bitihorn_0071_2048
    Cotton-grass. Canon 550D, Canon EF-S 15-85 mm f/3.5-5.6 IS USM @42 mm, f/14, 1/6 s, ISO 100, focus stack.

    For this to work, I needed the whole image to be sharp from front to back. With a focal length of 42 mm that is not possible in one shot, so I focus stacked two images, one with focus on the cotton-grass and one with focus on the background. I also normally don’t want an aperture smaller than f/14.

    By now I started to feel the need for some breakfast. I went back to the car and started on my way home, intending to find somewhere to eat in the morning sun. Just past Bitihorn and Båtskaret, I found what I was looking for. A small peak in the open landscape, just a couple of hundred meters from the road, and with a parking space nearby, was bathing in sunlight. I took my breakfast and climbed to the top.

    With Bitihorn behind me and the valley of Øystre Slidre spreading out in front of me, I enjoyed one of the best breakfasts I had had in a long time.

  • A summer night in the mountains. Part 1/2, Sunset

    This summer I had a few days to my self at our cabin in Valdres, Norway. One day I decided to drive to Valdresflya, which is a mountain area just outside Jotunheimen National Park. I wanted to spend the night there, so I could get both the sunset and the following sunrise. I also wanted to sleep in my car. That was not very comfortable, but it made it easy to get up for sunrise.

    So I drove north towards the sinking evening sun. My goal was to photograph a mountain called Bitihorn, which lies as a watch post at the entrance of Valdresflya, just where the road passes through Båtskaret (Boat Pass). Nearby is also the lake Bygdin, with a hotel by the shore, another potential photo location.

    Just before the hotel, there was something holding up the traffic. It turned out to be a herd of cows on their way home for the evening, longing to get milked.

    Cows passing Bygdin Hotel, with Bitihorn in the background.

    Just after passing the cows, I noticed a low ridge to the right of the road. I thought it would provide good views of both Bygdin and Bitihorn, so I found a place to park the car, put on some extra clothes, grabbed my camera bag and went for a short hike up the ridge.

    I noticed an area with some nice yellow flowers covering the ground. In the background, Bygdin was stretching out into the distant mountains. Some nice, puffy clouds were just starting to catch colour from the setting sun, even though it still was an hour until actual sunset. This scene called for a wide angle shot with lots of depth of field. I set up my camera with the Sigma 10-20 mm f/3.5 at 14 mm focal length and an aperture of f/11. This meant I needed an exposure time of 1/10 s for the foreground. I’m not too good at remembering which graduated filters I end up using, but I think I ended up with my 4-stop hard edge filter to darken down the sky.

    Bygdin-Bitihorn_0008_2048_01
    Flowers in front of Bygdin. Canon 550D, Sigma 10-20 mm f/3.5 @14 mm, f/11, 1/10 s, ISO 100, 4-stop hard grad.

    With this first «serious» photo of the trip done, it was time to prepare for the sunset photo of Bitihorn. I found a position with a good view to the south, and sheltered from the cool wind that was starting to pick up from the north. There were also several possible compositions, both wide and more close. I switched to my standard lens, the Canon EF-S 15-85 mm. While waiting for the light, I used the 10 second timer to take a selfie.

    Bygdin-Bitihorn_0019_2048_01
    Selfie in front of Bitihorn. Canon 550D, Sigma 10-20 mm f/3.5 @20 mm, f/11, 1/10 s, ISO 100.

    I knew that at the time of sunset, at around 10 pm, the sun would be blocked by the taller mountains of Jotunheimen, so my last chance of sunlight hitting Bitihorn would be some time before that. I wanted the last light hitting the top, and as much of the mountain as possible, so I watched closely, taking a photo whenever there was some sunlight. In the end, when the light finally hit the mountain top for a few minutes, there was no light anywhere else. I had another shot that I took a few minutes earlier, with sunlight hitting a small ridge at the foot of the mountain. In the final image I blended in a bit of this one to get the effect that I wanted. I used no filters on this one, but I bracketed with two stops on either side to get both the bright sky and clouds and the shadowed side of the mountain well exposed.

    Bygdin-Bitihorn_0032-Bygdin-Bitihorn_0030_blend_01_2048_01
    Last sunlight on Bitihorn. Canon 550D, Canon EF-S 15-85 mm f/3.5-5.6 IS USM @50 mm, f/11, bracketed composite.

    It was such a beautiful night, and I was really enjoying the solitude and the quietness. There was a small river flowing by beneath me, providing the sound track. I could not hear cars passing on the road, only the occasional motorcycle. While I was sitting there and the light faded away I found myself thinking about life, the universe and everything, and as always, the answer was 42.

    Jokes aside. From time to time a car passed on the road. There wasn’t much traffic, but a few minutes between each. And the way the road winded along the foot of Bitihorn gave me an idea for another photo. A long exposure with light trails. I put on a 2-stop grad to hold back what was left of light in the sky, and also a 6-stop ND to get long exposure times while it was still not very dark. Since the cars were so few and far between, I would need to follow one car the whole way, and that meant an exposure time of about two minutes. I also chose an aperture of f/8 for maximum sharpness. I don’t remember now if I used the 6-stop on the final image, but the graduated filter is there. I’m not quite sure it was necessary in the end, though.

    Bygdin-Bitihorn_0044_2048_01
    The Diamond Necklace. Canon 550D, Canon EF-S 15-85 mm f/3.5-5.6 IS USM @65 mm, f/8, 121 s, ISO 100

    I like this image very much, I think it is my favourite from this trip. The light trail reminds me of a diamond necklace, framing the peak of Bitihorn.

    By now it was almost getting dark. There was just enough light to find my way back to the car. I drove a few kilometers further, then I found a parking lot and tried to get a few hours of rest before sunrise.

    If you have been with me so far, then please stay tuned for Part 2, about the following morning’s sunrise shoot.

  • Flower print series

    Edit: Printler is unfortunately out of business, but if you are interested in my prints you can contact me directly via my contact page.

    Are you on the lookout for a new picture to have on your wall? Maybe you are redecorating your living room or you have moved recently to a new house or apartment. Then you may want something new to have on your walls, something that will look good in a modern environment dominated by subdued neutral colours.

    I have recently picked some of my best flower closeups and edited them again to create a series of images in a coherent, modern style. They feature a limited colour palette and let the main subject stand out from a nicely blurred background. I think these images will contribute to a relaxed atmosphere in your home or office.

    All images are currently only available in my Printler shop. You can have a look at the images below, and click the images to buy.

    Wood anemone 1

    Wood anemone 2

    Lily of the valley

    Tiger lily

    Chives

    White orchid

    Spore capsule


  • Darktable preferences, part 1

    An important part of any software is the preferences, or settings dialog. In here you can to a varying degree customize your experience to suit you tastes or needs. Some applications let you change just about anything, others are more restrictive, but there are almost always things you can do to feel more at home. Darktable is no exception.

    Darktable works very well right out of the box, but there will always be something you can change to make it a little bit better just for you. So what are you waiting for? Click the cogwheel and start exploring all the options. You’ll find the cogwheel at the right hand side of the upper panel. Don’t see it? Then the upper panel is probably disabled. Click the little white triangle at the very top of your screen to enable it.

    The preferences open in a separate window. Along the top is a row of tabs with different categories: GUI options, Core options, Session options, Shortcuts and Presets. If you have Lua scripts installed, there will also be a tab called Lua options.

    In this video I go through the GUI options tab. These options are all about how the interface behaves, like your choice of language, what to do when you delete images, what metedata to appply automatically on import, and a whole lot more.

    In the next video I’ll go through the other tabs. Until then, enjoy this video:

  • What’s new in Darktable 2.6

    What’s new in Darktable 2.6

    Like the last few Christmases have done, this one too gave us a brand new version of my favourite image processing software, Darktable. This time we got a whole lot of new toys to play with. A whopping three new modules, significant updates to several others and lots of smaller tweaks all around makes this one a really great release.

    New module: duplicate manager

    We have always had the possibility to make virtual copies of images in Darktable when we wanted different versions. The new module duplicate manager takes this to the next level. Now we can give the different versions names and we can compare edits quickly with a single mouse click.

    New module: filmic

    This is one of the most talked about news. It’s a new approach to shaping the contrast and fitting the relatively high dynamic range of modern cameras into the lower dynamic range of a jpg file, and at the same time mimicing somewhat the image characteristics of film. The author of this module, Aurélien Pierre, has written a long and very good article about this module on his website, which is well worth reading: http://bit.ly/2RXFQue

    New module: retouch

    This is a replacement module for the old spot removal module, with new and advanced tools. Spot removal is still available for compatibility reasons, but it is no longer necessary.

    Where spot removal only used cloning, retouch uses “intelligent” healing by default. Cloning, as well as blur and fill is also available. And where this module really shines is in its ability to work on different detail levels due to frequency separation.

    Updated modules: raw denoise and profiled denoise

    Both these modules have got a graph like the equalizer module, where you can ajust which frequency bands the noise reduction will affect. For profiled denoise this is only with the wavelets mode. This gives greater control over the noise reduction, minimizing unwanted artefacts. Profiled denoise has also got two presets, meant to be used together when you use two instances to separate color noise and luminance noise.

    Updated module: color balance

    The color balance module has been reworked and has got some good additions, making it much easier to use. You can now use two sliders in each of the shadows, midtones and highlight areas to select a hue and adjust the amount without having to balance the R, G and B channels separately. The old method is still available too.

    Updated module: tone curve

    The tone curve module has also got a few nice updates. Linked RGB channels is now the default mode, which for many will be the expected way. The curve graph can be viewed in logarithmic mode, which gives much better control in the low light areas. There is also a selection of three different algorithms to calculate the curve smoothness.

    Updated module: spot removal

    Not much here, but for those who want to continue using spot removal, you can now change the opacity of each shape intividually.

    Updates to parametric masking

    Parametric masks are now even more powerful and easy to make with the new edge aware feathering option. I wasn’t aware of this when I made the video, so I don’t mention it there.

    Other updates

    • You can have scroll bars on the sides of the image when zoomed in. This is available in Preferences.
    • The file type in lighttable view is more visible, as it it displayed vertically for portrait oriented images. It is still hidden for square images, though.
    • An option in Preferences makes it possible to display some EXIF data when you hover over an image in lighttable.
    • Some new sorting options are introduced.
    • I am sure there are things I have not mentioned here. For a complete list of everything new and how to use it, read the blog post on the Darktable website: http://bit.ly/2RSwwrL

    And don’t forget to view my video:

  • Black and White in Darktable

    Black and white is a genre as old as photography itself. Back then it was the only way, if you wanted colours you had to get out your crayons and colour the print. These days we do it the opposite way. We take a colour image and make it black and white.

    Of course black and white means essentially that there’s no colour. But you can’t make a great black and white image by simply turning the saturation to zero. The colours are an important part of a colour image, and if you remove them you will have to compensate with something. And what is left when you take the colours away is contrast. To make a striking black and white image, we often have to increase the contrast, not only for the whole image, but also locally.

    One very useful way of manipulating the contrast of a black and white image is to adjust the brightness of individual colours. In Darktable, we have essentially three tools for this:

    • Channel Mixer: Decide how much each of the red, green and blue channels contribute to the final image.
    • Monochrome: Mimics the way coloured filters are used with black and white film.
    • Color Zones: My favourite. Adjust the brightness of up to seven different colours in the image, and also decide the exact hues to adjust.

    In the video below i explain how to make stunning black and white images in darktable.

  • How to use Darktable’s Mask Manager

    When making local adjustments in Darktable, one of the ways to isolate a part of an image is to use drawn masks. These can be combined in a number of ways, more than you can accomplish directly in the module where you make them. They can also be reused in other modules, and organized in different ways. The masks can even be named, so you can easily see which is which.

    When you have just started out with Darktable it may not be that obvious. You see the drawn masks in the different modules, but there’s a limit to what you can do with them. Now take a look at the left side of the screen and you’ll find the Mask Manager. Starting to use this will open up many new possibilities for your drawn masks.

    It is important to keep in mind that the Mask Manager can not handle parametric masks. These are always dependent on current pixel values, so they can only be used when and where they are made. That said, I think I saw somewhere that the ability to store parametric masks may come at a later date.

    But for now it is all about your circles, ellipses, patches, brushes and gradients. View the video below and learn how to handle them like a pro.